text2image
Summary
Number of checkpoints: 6
Number of configs: 18
Number of papers: 8
ALGORITHM: 8
FastComposer (2023)
Task: Text2Image
Abstract
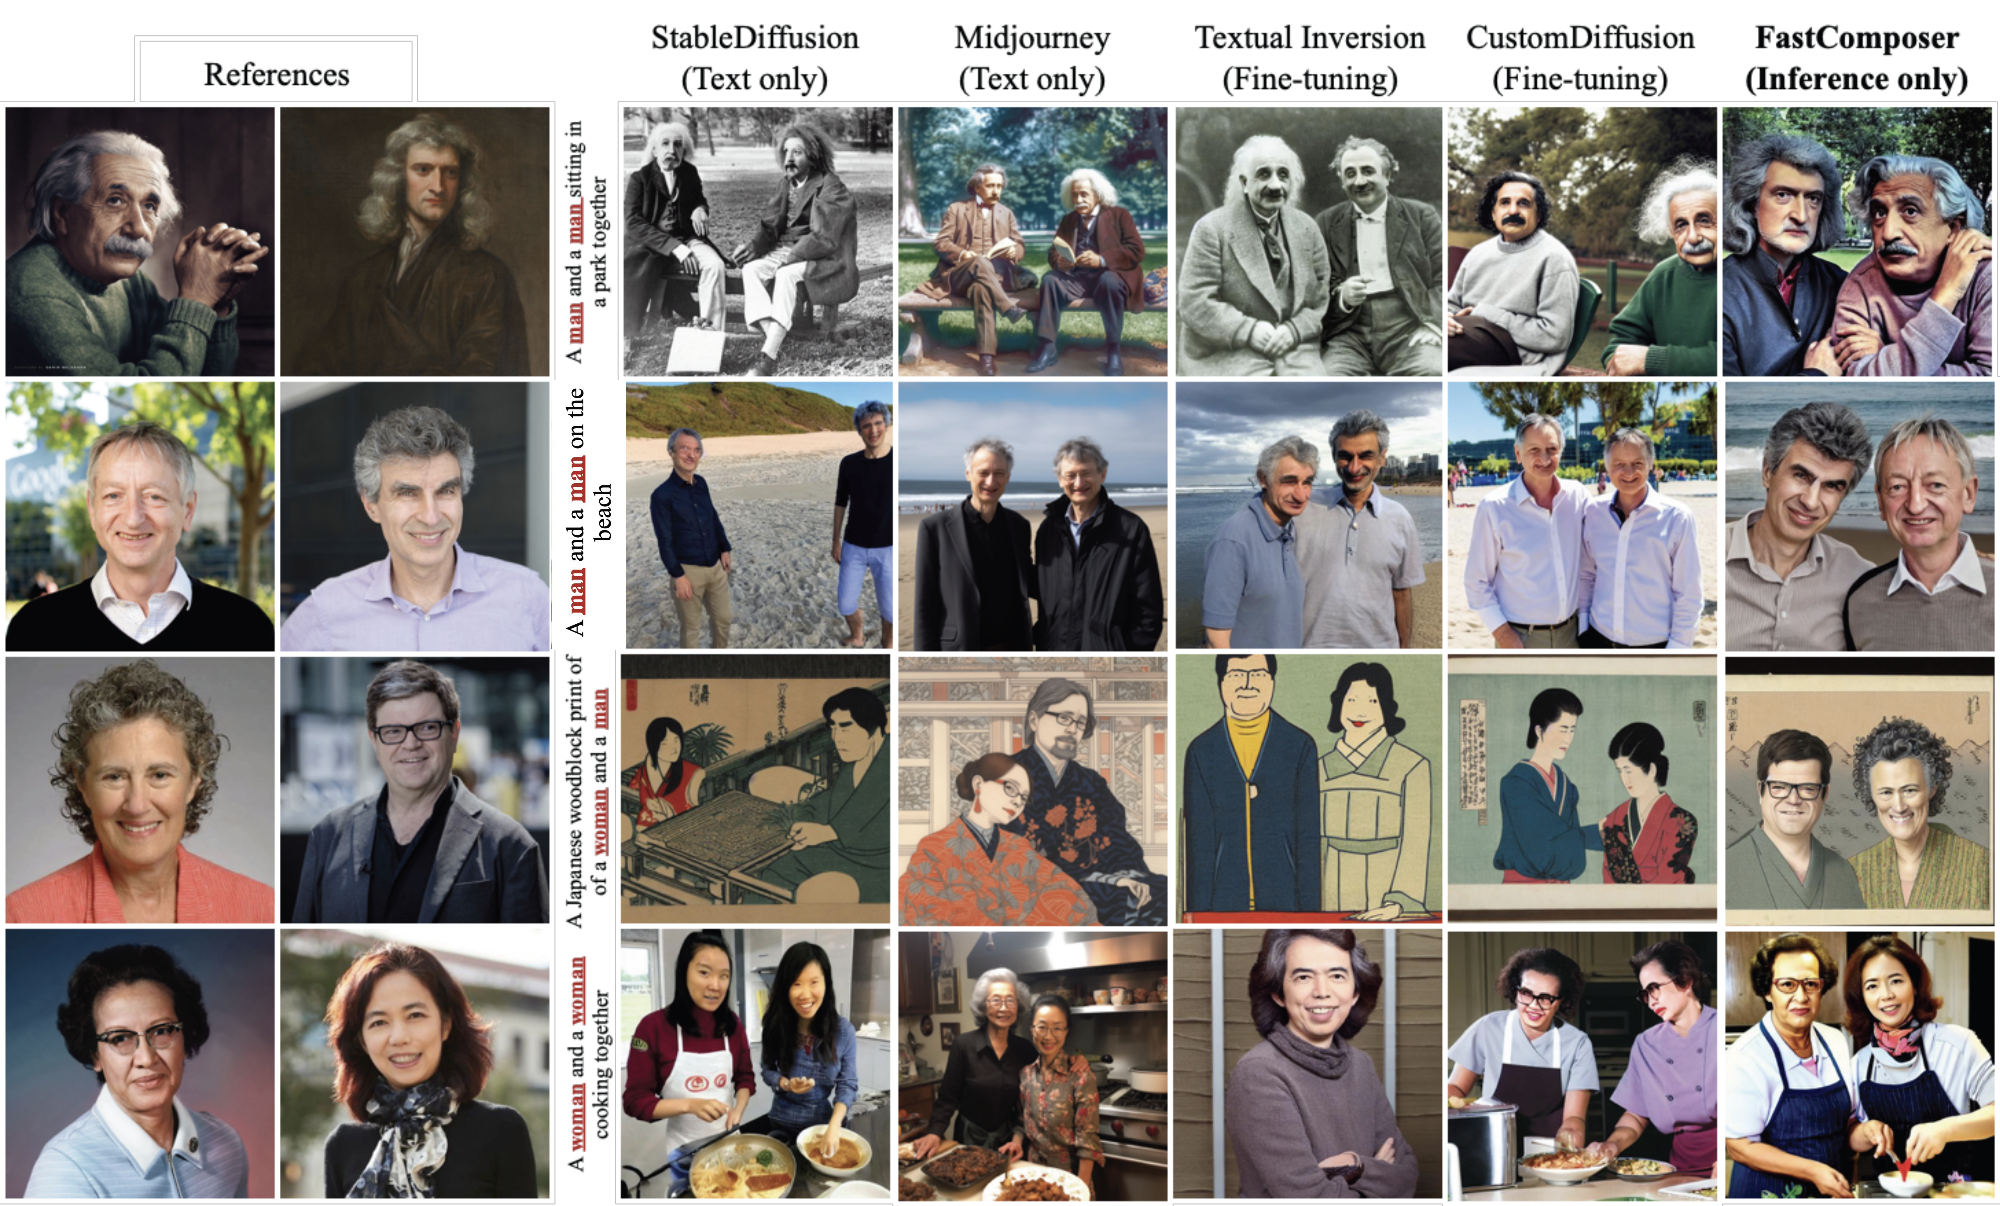
Diffusion models excel at text-to-image generation, especially in subject-driven generation for personalized images. However, existing methods are inefficient due to the subject-specific fine-tuning, which is computationally intensive and hampers efficient deployment. Moreover, existing methods struggle with multi-subject generation as they often blend features among subjects. We present FastComposer which enables efficient, personalized, multi-subject text-to-image generation without fine-tuning. FastComposer uses subject embeddings extracted by an image encoder to augment the generic text conditioning in diffusion models, enabling personalized image generation based on subject images and textual instructions with only forward passes. To address the identity blending problem in the multi-subject generation, FastComposer proposes cross-attention localization supervision during training, enforcing the attention of reference subjects localized to the correct regions in the target images. Naively conditioning on subject embeddings results in subject overfitting. FastComposer proposes delayed subject conditioning in the denoising step to maintain both identity and editability in subject-driven image generation. FastComposer generates images of multiple unseen individuals with different styles, actions, and contexts. It achieves 300x-2500x speedup compared to fine-tuning-based methods and requires zero extra storage for new subjects. FastComposer paves the way for efficient, personalized, and high-quality multi-subject image creation.
Pretrained models
This model has several weights including vae, unet and clip. You should download the weights from stable-diffusion-1.5 and clipModel,and then change the ‘stable_diffusion_v15_url’ and ‘clip_vit_url’ in config to the corresponding weights path and “finetuned_model_path” to the weight path of fastcomposer.
| Model | Dataset | Download |
|---|---|---|
| FastComposer | - | model |
Quick Start
You can run the demo locally by
python demo/gradio_fastcomposer.py
Or running the following codes, you can get a text-generated image.
import numpy as np
import mmcv
from mmengine import Config
from PIL import Image

from mmagic.registry import MODELS
from mmagic.utils import register_all_modules
import torch, gc

gc.collect()
torch.cuda.empty_cache()

register_all_modules()

cfg_file = Config.fromfile('configs/fastcomposer/fastcomposer_8xb16_FFHQ.py')

fastcomposer = MODELS.build(cfg_file.model).cuda()

prompt = "A man img and a man img sitting in a park"
negative_prompt = "((((ugly)))), (((duplicate))), ((morbid)), ((mutilated)), [out of frame], extra fingers, mutated hands, ((poorly drawn hands)), ((poorly drawn face)), (((mutation))), (((deformed))), ((ugly)), blurry, ((bad anatomy)), (((bad proportions))), ((extra limbs)), cloned face, (((disfigured))). out of frame, ugly, extra limbs, (bad anatomy), gross proportions, (malformed limbs), ((missing arms)), ((missing legs)), (((extra arms))), (((extra legs))), mutated hands, (fused fingers), (too many fingers), (((long neck)))"
alpha_ = 0.75
guidance_scale = 5
num_steps = 50
num_images = 1
image = []
seed = -1

image1 = mmcv.imread('https://user-images.githubusercontent.com/14927720/265911400-91635451-54b6-4dc6-92a7-c1d02f88b62e.jpeg')
image2 = mmcv.imread('https://user-images.githubusercontent.com/14927720/265911502-66b67f53-dff0-4d25-a9af-3330e446aa48.jpeg')

image.append(Image.fromarray(image1))
image.append(Image.fromarray(image2))

if len(image) == 0:
    raise Exception("You need to upload at least one image.")

num_subject_in_text = (
        np.array(fastcomposer.special_tokenizer.encode(prompt))
        == fastcomposer.image_token_id
).sum()
if num_subject_in_text != len(image):
    raise Exception(f"Number of subjects in the text description doesn't match the number of reference images, #text subjects: {num_subject_in_text} #reference image: {len(image)}",
    )

if seed == -1:
    seed = np.random.randint(0, 1000000)

device = torch.device('cuda' if torch.cuda.is_available(
    ) else 'cpu')
generator = torch.Generator(device=device)
generator.manual_seed(seed)

output_dict = fastcomposer.infer(prompt,
                                 negative_prompt=negative_prompt,
                                 height=512,
                                 width=512,
                                 num_inference_steps=num_steps,
                                 guidance_scale=guidance_scale,
                                 num_images_per_prompt=num_images,
                                 generator=generator,
                                 alpha_=alpha_,
                                 reference_subject_images=image)

samples = output_dict['samples']
for idx, sample in enumerate(samples):
    sample.save(f'sample_{idx}.png')
Citation
@article{xiao2023fastcomposer,
            title={FastComposer: Tuning-Free Multi-Subject Image Generation with Localized Attention},
            author={Xiao, Guangxuan and Yin, Tianwei and Freeman, William T. and Durand, Frédo and Han, Song},
            journal={arXiv},
            year={2023}
          }
Control Net (2023)
Task: Text2Image
Abstract
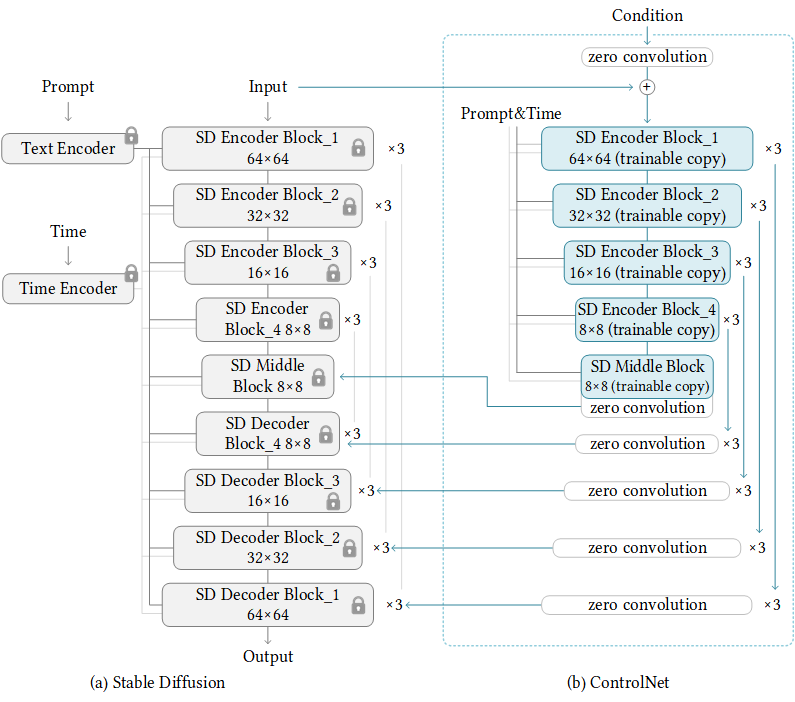
We present a neural network structure, ControlNet, to control pretrained large diffusion models to support additional input conditions. The ControlNet learns task-specific conditions in an end-to-end way, and the learning is robust even when the training dataset is small (< 50k). Moreover, training a ControlNet is as fast as fine-tuning a diffusion model, and the model can be trained on a personal devices. Alternatively, if powerful computation clusters are available, the model can scale to large amounts (millions to billions) of data. We report that large diffusion models like Stable Diffusion can be augmented with ControlNets to enable conditional inputs like edge maps, segmentation maps, keypoints, etc. This may enrich the methods to control large diffusion models and further facilitate related applications.
Pretrained models
We use ControlNet’s weights provided by HuggingFace Diffusers. You do not have to download the weights manually. If you use Diffusers wrapper, the weights will be downloaded automatically.
This model has several weights including vae, unet and clip. You should download the weights from stable-diffusion-1.5 and change the ‘pretrained_model_path’ in config to the weights dir.
| Model | Dataset | Download |
|---|---|---|
| ControlNet-Demo | - | - |
| ControlNet-Canny | - | model |
| ControlNet-Pose | - | model |
| ControlNet-Segmentation | - | model |
Noted that, ControlNet-Demo is a demo config to train ControlNet with toy dataset named Fill50K.
Besides above configs, ControlNet have weight with other condition inputs, such as depth, hed, mlsd, normal, scribble. You can simple change the from_pretrained field of ControlNet to use these weights. For example:
## Switch from canny....
controlnet=dict(
    type='ControlNetModel',
    from_pretrained='lllyasviel/sd-controlnet-canny')

## To normal....
controlnet=dict(
    type='ControlNetModel',
    from_pretrained='lllyasviel/sd-controlnet-normal')
Quick Start
Running the following codes, you can get a text-generated image.
import cv2
import numpy as np
import mmcv
from mmengine import Config
from PIL import Image

from mmagic.registry import MODELS
from mmagic.utils import register_all_modules

register_all_modules()

cfg = Config.fromfile('configs/controlnet/controlnet-canny.py')
controlnet = MODELS.build(cfg.model).cuda()

prompt = 'Room with blue walls and a yellow ceiling.'
control_url = 'https://user-images.githubusercontent.com/28132635/230288866-99603172-04cb-47b3-8adb-d1aa532d1d2c.jpg'
control_img = mmcv.imread(control_url)
control = cv2.Canny(control_img, 100, 200)
control = control[:, :, None]
control = np.concatenate([control] * 3, axis=2)
control = Image.fromarray(control)

output_dict = controlnet.infer(prompt, control=control)
samples = output_dict['samples']
for idx, sample in enumerate(samples):
    sample.save(f'sample_{idx}.png')
controls = output_dict['controls']
for idx, control in enumerate(controls):
    control.save(f'control_{idx}.png')

'control_0.png' |

'sample_0.png' |
If you want to pretrained weights rather than original Stable-Diffusion v1.5, you can refers to the following codes.
import mmcv
from mmengine import Config
from PIL import Image

from mmagic.registry import MODELS
from mmagic.utils import register_all_modules

register_all_modules()

cfg = Config.fromfile('configs/controlnet/controlnet-pose.py')
## convert ControlNet's weight from SD-v1.5 to Counterfeit-v2.5
cfg.model.unet.from_pretrained = 'gsdf/Counterfeit-V2.5'
cfg.model.vae.from_pretrained = 'gsdf/Counterfeit-V2.5'
cfg.model.init_cfg['type'] = 'convert_from_unet'

controlnet = MODELS.build(cfg.model).cuda()
## call init_weights manually to convert weight
controlnet.init_weights()

prompt = 'masterpiece, best quality, sky, black hair, skirt, sailor collar, looking at viewer, short hair, building, bangs, neckerchief, long sleeves, cloudy sky, power lines, shirt, cityscape, pleated skirt, scenery, blunt bangs, city, night, black sailor collar, closed mouth'

control_url = 'https://user-images.githubusercontent.com/28132635/230380893-2eae68af-d610-4f7f-aa68-c2f22c2abf7e.png'
control_img = mmcv.imread(control_url)
control = Image.fromarray(control_img)
control.save('control.png')

output_dict = controlnet.infer(prompt, control=control, width=512, height=512, guidance_scale=7.5)
samples = output_dict['samples']
for idx, sample in enumerate(samples):
    sample.save(f'sample_{idx}.png')
controls = output_dict['controls']
for idx, control in enumerate(controls):
    control.save(f'control_{idx}.png')

'control_0.png' |

'sample_0.png' |
Using MMInferencer
You can only use several lines of codes to play controlnet by MMagic!
from mmagic.apis import MMagicInferencer

## controlnet-canny
controlnet_canny_inferencer = MMagicInferencer(model_name='controlnet', model_setting=1)
text_prompts = 'Room with blue walls and a yellow ceiling.'
control = 'https://user-images.githubusercontent.com/28132635/230297033-4f5c32df-365c-4cf4-8e4f-1b76a4cbb0b7.png'
result_out_dir = 'controlnet_canny_res.png'
controlnet_canny_inferencer.infer(text=text_prompts, control=control, result_out_dir=result_out_dir)

## controlnet-pose
controlnet_pose_inferencer = MMagicInferencer(model_name='controlnet', model_setting=2)
text_prompts = 'masterpiece, best quality, sky, black hair, skirt, sailor collar, looking at viewer, short hair, building, bangs, neckerchief, long sleeves, cloudy sky, power lines, shirt, cityscape, pleated skirt, scenery, blunt bangs, city, night, black sailor collar, closed mouth'
control = 'https://user-images.githubusercontent.com/28132635/230380893-2eae68af-d610-4f7f-aa68-c2f22c2abf7e.png'
result_out_dir = 'controlnet_pose_res.png'
controlnet_pose_inferencer.infer(text=text_prompts, control=control, result_out_dir=result_out_dir)

## controlnet-seg
controlnet_seg_inferencer = MMagicInferencer(model_name='controlnet', model_setting=3)
text_prompts = 'black house, blue sky'
control = 'https://github-production-user-asset-6210df.s3.amazonaws.com/49083766/243599897-553a4c46-c61d-46df-b820-59a49aaf6678.png'
result_out_dir = 'controlnet_seg_res.png'
controlnet_seg_inferencer.infer(text=text_prompts, control=control, result_out_dir=result_out_dir)
Train your own ControlNet!
You can start training your own ControlNet with the toy dataset Fill50K with the following command:
bash tools/dist_train.sh configs/controlnet/controlnet-1xb1-demo_dataset 1
If you want use gradient accumulation, you can add accumulative_counts field to the optimizer’s config as follow:
## From...
optim_wrapper = dict(controlnet=dict(optimizer=dict(type='AdamW', lr=1e-5)))
## To...
optim_wrapper = dict(
    controlnet=dict(accumulative_counts=4, optimizer=dict(type='AdamW', lr=1e-5)))
Use ToMe to accelerate your training and inference
We support tomesd now! It is developed for stable-diffusion-based models referring to ToMe, an efficient ViT speed-up tool based on token merging. To work on with tomesd in mmagic, you just need to add tomesd_cfg to model in ControlNet-Canny. The only requirement is torch >= 1.12.1 in order to properly support torch.Tensor.scatter_reduce() functionality. Please do check it before running the demo.
model = dict(
    type='ControlStableDiffusion',
    ...
    tomesd_cfg=dict(ratio=0.5),
    ...
    init_cfg=dict(type='init_from_unet'))
For more details, you can refer to Stable Diffusion Acceleration.
Comments
Our codebase for the stable diffusion models builds heavily on diffusers codebase and the model weights are from stable-diffusion-1.5 and ControlNet.
Thanks for the efforts of the community!
Citation
@misc{zhang2023adding,
      title={Adding Conditional Control to Text-to-Image Diffusion Models},
      author={Lvmin Zhang and Maneesh Agrawala},
      year={2023},
      eprint={2302.05543},
      archivePrefix={arXiv},
      primaryClass={cs.CV}
}
ViCo (2023)
Task: Text2Image
Abstract
Personalized text-to-image generation using diffusion models has recently been proposed and attracted lots of attention. Given a handful of images containing a novel concept (e.g., a unique toy), we aim to tune the generative model to capture fine visual details of the novel concept and generate photorealistic images following a text condition. We present a plug-in method, named ViCo, for fast and lightweight personalized generation. Specifically, we propose an image attention module to condition the diffusion process on the patch-wise visual semantics. We introduce an attention-based object mask that comes almost at no cost from the attention module. In addition, we design a simple regularization based on the intrinsic properties of text-image attention maps to alleviate the common overfitting degradation. Unlike many existing models, our method does not finetune any parameters of the original diffusion model. This allows more flexible and transferable model deployment. With only light parameter training (~6% of the diffusion U-Net), our method achieves comparable or even better performance than all state-of-the-art models both qualitatively and quantitatively.
Quick Start
Download concept data and imagenet_templates_small.txt from here. and save to
data/vico/
The file structure will be like this:
data
└── vico
    └──batman
       ├── 1.jpg
       ├── 2.jpg
       ├── 3.jpg
       └── 4.jpg
    └──clock
       ├── 1.jpg
       ├── 2.jpg
       ├── 3.jpg
       └── 4.jpg
    ...
    └──imagenet_templates_small.txt
Customize your config
## Only need to care about these

## which concept you want to customize
concept_dir = 'dog7'

## the new token to denote the concept
placeholder: str = 'S*'

## better to be the superclass of concept
initialize_token: str = 'dog'
Start training with the following command:
## 4 GPUS
bash tools/dist_train.sh configs/vico/vico.py 4
## 1 GPU
python tools/train.py configs/vico/vico.py
Use the pretrained checkpoins to inference
import torch
from mmengine import Config
from PIL import Image

from mmagic.registry import MODELS
from mmagic.utils import register_all_modules

register_all_modules()

## say you have downloaded the pretrained weights
cfg = Config.fromfile('configs/vico/dog.py')
state_dict = torch.load("./dog.pth")
vico = MODELS.build(cfg.model)
vico.load_state_dict(state_dict, strict=False)
vico = vico.cuda()

prompt = ["A photo of S*", "A photo of S* on the beach"]
reference = "data/vico/dog7/01.jpg"
image_ref = Image.open(reference)
with torch.no_grad():
    output = vico.infer(prompt=prompt, image_reference=image_ref, seed=123, num_images_per_prompt=2)['samples'][0]
output.save("infer.png")
(Optional) If you want to use the weight trained by the commands at step3, here are codes to extract the trained parameters, then you can infer with it like step4
import torch
def extract_vico_parameters(state_dict):
    new_state_dict = dict()
    for k, v in state_dict.items():
        if 'image_cross_attention' in k or 'trainable_embeddings' in k:
            new_k = k.replace('module.', '')
            new_state_dict[new_k] = v
    return new_state_dict

checkpoint = torch.load("work_dirs/vico/iter_400.pth")
new_checkpoint = extract_vico_parameters(checkpoint['state_dict'])
torch.save(new_checkpoint, "work_dirs/vico/dog.pth")
|
'vico' |
Comments
Our codebase for the stable diffusion models builds heavily on diffusers codebase and the model weights are from stable-diffusion-1.5.
Thanks for the efforts of the community!
Citation
@inproceedings{Hao2023ViCo,
  title={ViCo: Detail-Preserving Visual Condition for Personalized Text-to-Image Generation},
  author={Shaozhe Hao and Kai Han and Shihao Zhao and Kwan-Yee K. Wong},
  year={2023}
}
Stable Diffusion XL (2023)
Task: Text2Image, Inpainting
Abstract
We present SDXL, a latent diffusion model for text-to-image synthesis. Compared to previous versions of Stable Diffusion, SDXL leverages a three times larger UNet backbone: The increase of model parameters is mainly due to more attention blocks and a larger cross-attention context as SDXL uses a second text encoder. We design multiple novel conditioning schemes and train SDXL on multiple aspect ratios. We also introduce a refinement model which is used to improve the visual fidelity of samples generated by SDXL using a post-hoc image-to-image technique. We demonstrate that SDXL shows drastically improved performance compared the previous versions of Stable Diffusion and achieves results competitive with those of black-box state-of-the-art image generators.
Pretrained models
| Model | Task | Dataset | Download |
|---|---|---|---|
| stable_diffusion_xl | Text2Image | - | - |
We use stable diffusion xl weights. This model has several weights including vae, unet and clip.
You may download the weights from stable-diffusion-xl and change the ‘from_pretrained’ in config to the weights dir.
Quick Start
Running the following codes, you can get a text-generated image.
from mmengine import MODELS, Config

from mmengine.registry import init_default_scope

init_default_scope('mmagic')

config = 'configs/stable_diffusion_xl/stable-diffusion_xl_ddim_denoisingunet.py'
config = Config.fromfile(config).copy()

StableDiffuser = MODELS.build(config.model)
prompt = 'A mecha robot in a favela in expressionist style'
StableDiffuser = StableDiffuser.to('cuda')

image = StableDiffuser.infer(prompt)['samples'][0]
image.save('robot.png')
Comments
Our codebase for the stable diffusion models builds heavily on diffusers codebase and the model weights are from stable-diffusion-xl.
Thanks for the efforts of the community!
Disco Diffusion (2022)
Task: Text2Image, Image2Image
Abstract
Disco Diffusion (DD) is a Google Colab Notebook which leverages an AI Image generating technique called CLIP-Guided Diffusion to allow you to create compelling and beautiful images from text inputs.
Created by Somnai, augmented by Gandamu, and building on the work of RiversHaveWings, nshepperd, and many others. See more details in Credits.

|

|

|
Results and models
We have converted several unet weights and offer related configs. See more details of different unet in Tutorial.
| Model | Dataset | Task | Download |
|---|---|---|---|
| 512x512_diffusion_uncond_finetune_008100 | ImageNet | Text2Image | model |
| 256x256_diffusion_uncond | ImageNet | Text2Image | model |
| portrait_generator_v001 | unknown | Text2Image | model |
| Model | Download |
|---|---|
| pixelartdiffusion_expanded | Coming soon! |
| pixel_art_diffusion_hard_256 | Coming soon! |
| pixel_art_diffusion_soft_256 | Coming soon! |
| pixelartdiffusion4k | Coming soon! |
| watercolordiffusion_2 | Coming soon! |
| watercolordiffusion | Coming soon! |
| PulpSciFiDiffusion | Coming soon! |
To-do List
[x] Text2Image
[x] Image2Image
[x] Imagenet, portrait diffusion models
[ ] pixelart, watercolor, sci-fiction diffusion models
[ ] image prompt
[ ] video generation
[ ] faster sampler(plms, dpm-solver etc.)
We really welcome community users supporting these items and any other interesting stuffs!
Quick Start
Running the following codes, you can get a text-generated image.
from mmengine import Config, MODELS
from mmengine.registry import init_default_scope
from torchvision.utils import save_image

init_default_scope('mmagic')

disco = MODELS.build(
    Config.fromfile('configs/disco_diffusion/disco-baseline.py').model).cuda().eval()
text_prompts = {
    0: [
        "A beautiful painting of a singular lighthouse, shining its light across a tumultuous sea of blood by greg rutkowski and thomas kinkade, Trending on artstation.",
        "yellow color scheme"
    ]
}
image = disco.infer(
    height=768,
    width=1280,
    text_prompts=text_prompts,
    show_progress=True,
    num_inference_steps=250,
    eta=0.8)['samples']
save_image(image, "image.png")
Tutorials
Considering that disco-diffusion contains many adjustable parameters, we provide users with a jupyter-notebook / colab tutorial that exhibits the meaning of different parameters, and gives results corresponding to adjustment.
Refer to Disco Sheet.
Credits
Since our adaptation of disco-diffusion are heavily influenced by disco colab, here we copy the credits below.
Credits
Original notebook by Katherine Crowson (https://github.com/crowsonkb, https://twitter.com/RiversHaveWings). It uses either OpenAI's 256x256 unconditional ImageNet or Katherine Crowson's fine-tuned 512x512 diffusion model (https://github.com/openai/guided-diffusion), together with CLIP (https://github.com/openai/CLIP) to connect text prompts with images.Modified by Daniel Russell (https://github.com/russelldc, https://twitter.com/danielrussruss) to include (hopefully) optimal params for quick generations in 15-100 timesteps rather than 1000, as well as more robust augmentations.
Further improvements from Dango233 and nshepperd helped improve the quality of diffusion in general, and especially so for shorter runs like this notebook aims to achieve.
Vark added code to load in multiple Clip models at once, which all prompts are evaluated against, which may greatly improve accuracy.
The latest zoom, pan, rotation, and keyframes features were taken from Chigozie Nri’s VQGAN Zoom Notebook (https://github.com/chigozienri, https://twitter.com/chigozienri)
Advanced DangoCutn Cutout method is also from Dango223.
–
Disco:
Somnai (https://twitter.com/Somnai_dreams) added Diffusion Animation techniques, QoL improvements and various implementations of tech and techniques, mostly listed in the changelog below.
3D animation implementation added by Adam Letts (https://twitter.com/gandamu_ml) in collaboration with Somnai. Creation of disco.py and ongoing maintenance.
Turbo feature by Chris Allen (https://twitter.com/zippy731)
Improvements to ability to run on local systems, Windows support, and dependency installation by HostsServer (https://twitter.com/HostsServer)
VR Mode by Tom Mason (https://twitter.com/nin_artificial)
Horizontal and Vertical symmetry functionality by nshepperd. Symmetry transformation_steps by huemin (https://twitter.com/huemin_art). Symmetry integration into Disco Diffusion by Dmitrii Tochilkin (https://twitter.com/cut_pow).
Warp and custom model support by Alex Spirin (https://twitter.com/devdef).
Pixel Art Diffusion, Watercolor Diffusion, and Pulp SciFi Diffusion models from KaliYuga (https://twitter.com/KaliYuga_ai). Follow KaliYuga’s Twitter for the latest models and for notebooks with specialized settings.
Integration of OpenCLIP models and initiation of integration of KaliYuga models by Palmweaver / Chris Scalf (https://twitter.com/ChrisScalf11)
Integrated portrait_generator_v001 from Felipe3DArtist (https://twitter.com/Felipe3DArtist)
Citation
@misc{github,
  author={alembics},
  title={disco-diffusion},
  year={2022},
  url={https://github.com/alembics/disco-diffusion},
}
DreamBooth (2022)
Task: Text2Image
Abstract
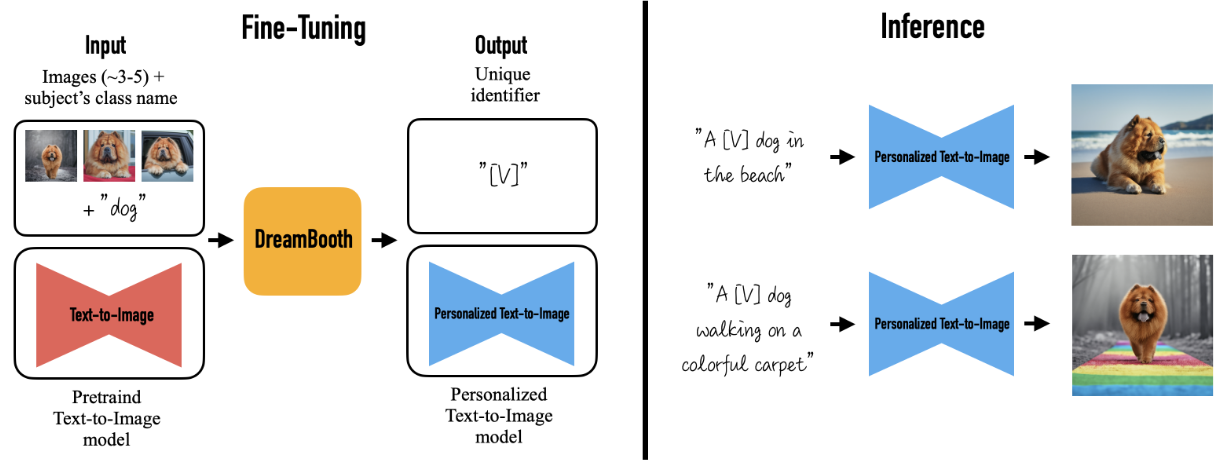
Large text-to-image models achieved a remarkable leap in the evolution of AI, enabling high-quality and diverse synthesis of images from a given text prompt. However, these models lack the ability to mimic the appearance of subjects in a given reference set and synthesize novel renditions of them in different contexts. In this work, we present a new approach for “personalization” of text-to-image diffusion models. Given as input just a few images of a subject, we fine-tune a pretrained text-to-image model such that it learns to bind a unique identifier with that specific subject. Once the subject is embedded in the output domain of the model, the unique identifier can be used to synthesize novel photorealistic images of the subject contextualized in different scenes. By leveraging the semantic prior embedded in the model with a new autogenous class-specific prior preservation loss, our technique enables synthesizing the subject in diverse scenes, poses, views and lighting conditions that do not appear in the reference images. We apply our technique to several previously-unassailable tasks, including subject recontextualization, text-guided view synthesis, and artistic rendering, all while preserving the subject’s key features. We also provide a new dataset and evaluation protocol for this new task of subject-driven generation.
Configs
| Model | Dataset | Download |
|---|---|---|
| DreamBooth | - | - |
| DreamBooth (Finetune Text Encoder) | - | - |
| DreamBooth with Prior-Preservation Loss | - | - |
| DreamBooth LoRA | - | - |
| DreamBooth LoRA with Prior-Preservation Loss | - | - |
Quick Start
Download data and save to
data/dreambooth/
The file structure will be like this:
data
└── dreambooth
    └──imgs
       ├── alvan-nee-Id1DBHv4fbg-unsplash.jpeg
       ├── alvan-nee-bQaAJCbNq3g-unsplash.jpeg
       ├── alvan-nee-brFsZ7qszSY-unsplash.jpeg
       └── alvan-nee-eoqnr8ikwFE-unsplash.jpeg
Start training with the following command:
bash tools/dist_train.sh configs/dreambooth/dreambooth.py 1
## or
bash tools/dist_train.sh configs/dreambooth/dreambooth-lora.py 1

'dreambooth' |

'dreambooth-lora' |
Use ToMe to accelerate your training and inference
We support tomesd now! It is developed for stable-diffusion-based models referring to ToMe, an efficient ViT speed-up tool based on token merging. To work on with tomesd in mmagic, you just need to add tomesd_cfg to model in DreamBooth. The only requirement is torch >= 1.12.1 in order to properly support torch.Tensor.scatter_reduce() functionality. Please do check it before running the demo.
model = dict(
    type='DreamBooth',
    ...
    tomesd_cfg=dict(ratio=0.5),
    ...
    val_prompts=val_prompts)
For more details, you can refer to Stable Diffusion Acceleration.
Comments
Our codebase for the stable diffusion models builds heavily on diffusers codebase and the model weights are from stable-diffusion-1.5.
Thanks for the efforts of the community!
Citation
@article{ruiz2022dreambooth,
  title={Dreambooth: Fine tuning text-to-image diffusion models for subject-driven generation},
  author={Ruiz, Nataniel and Li, Yuanzhen and Jampani, Varun and Pritch, Yael and Rubinstein, Michael and Aberman, Kfir},
  journal={arXiv preprint arXiv:2208.12242},
  year={2022}
}
Stable Diffusion (2022)
Task: Text2Image, Inpainting
Abstract
Stable Diffusion is a latent diffusion model conditioned on the text embeddings of a CLIP text encoder, which allows you to create images from text inputs. This model builds upon the CVPR’22 work High-Resolution Image Synthesis with Latent Diffusion Models. The official code was released at stable-diffusion and also implemented at diffusers. We support this algorithm here to facilitate the community to learn together and compare it with other text2image methods.

A mecha robot in a favela in expressionist style |

A Chinese palace is beside a beautiful lake |

A panda is having dinner at KFC |
Pretrained models
| Model | Task | Dataset | Download |
|---|---|---|---|
| stable_diffusion_v1.5 | Text2Image | - | - |
| stable_diffusion_v1.5_tomesd | Text2Image | - | - |
| stable_diffusion_v1.5_inpaint | Inpainting | - | - |
We use stable diffusion v1.5 weights. This model has several weights including vae, unet and clip.
You may download the weights from stable-diffusion-1.5 and change the ‘from_pretrained’ in config to the weights dir.
Download with git:
git lfs install
git clone https://huggingface.co/runwayml/stable-diffusion-v1-5
Quick Start
Running the following codes, you can get a text-generated image.
from mmengine import MODELS, Config
from torchvision import utils

from mmengine.registry import init_default_scope

init_default_scope('mmagic')

config = 'configs/stable_diffusion/stable-diffusion_ddim_denoisingunet.py'
config = Config.fromfile(config).copy()
## change the 'pretrained_model_path' if you have downloaded the weights manually
## config.model.unet.from_pretrained = '/path/to/your/stable-diffusion-v1-5'
## config.model.vae.from_pretrained = '/path/to/your/stable-diffusion-v1-5'

StableDiffuser = MODELS.build(config.model)
prompt = 'A mecha robot in a favela in expressionist style'
StableDiffuser = StableDiffuser.to('cuda')

image = StableDiffuser.infer(prompt)['samples'][0]
image.save('robot.png')
To inpaint an image, you could run the following codes.
import mmcv
from mmengine import MODELS, Config
from mmengine.registry import init_default_scope
from PIL import Image

init_default_scope('mmagic')

config = 'configs/stable_diffusion/stable-diffusion_ddim_denoisingunet-inpaint.py'
config = Config.fromfile(config).copy()
## change the 'pretrained_model_path' if you have downloaded the weights manually
## config.model.unet.from_pretrained = '/path/to/your/stable-diffusion-inpainting'
## config.model.vae.from_pretrained = '/path/to/your/stable-diffusion-inpainting'

StableDiffuser = MODELS.build(config.model)
prompt = 'a mecha robot sitting on a bench'

img_url = 'https://raw.githubusercontent.com/CompVis/latent-diffusion/main/data/inpainting_examples/overture-creations-5sI6fQgYIuo.png'  ## noqa
mask_url = 'https://raw.githubusercontent.com/CompVis/latent-diffusion/main/data/inpainting_examples/overture-creations-5sI6fQgYIuo_mask.png'  ## noqa

image = Image.fromarray(mmcv.imread(img_url, channel_order='rgb'))
mask = Image.fromarray(mmcv.imread(mask_url)).convert('L')
StableDiffuser = StableDiffuser.to('cuda')

image = StableDiffuser.infer(
    prompt,
    image,
    mask
)['samples'][0]
image.save('inpaint.png')
Use ToMe to accelerate your stable diffusion model
We support tomesd now! It is developed based on ToMe, an efficient ViT speed-up tool based on token merging. To work on with tomesd in mmagic, you just need to add tomesd_cfg to model as shown in stable_diffusion_v1.5_tomesd. The only requirement is torch >= 1.12.1 in order to properly support torch.Tensor.scatter_reduce() functionality. Please do check it before running the demo.
...
model = dict(
    type='StableDiffusion',
    unet=unet,
    vae=vae,
    enable_xformers=False,
    text_encoder=dict(
        type='ClipWrapper',
        clip_type='huggingface',
        pretrained_model_name_or_path=stable_diffusion_v15_url,
        subfolder='text_encoder'),
    tokenizer=stable_diffusion_v15_url,
    scheduler=diffusion_scheduler,
    test_scheduler=diffusion_scheduler,
    tomesd_cfg=dict(
        ratio=0.5))
The detailed settings for tomesd_cfg are as follows:
ratio (float): The ratio of tokens to merge. For example, 0.4 would reduce the total number of tokens by 40%.The maximum value for this is 1-(1/(sx*sy)). By default, the max ratio is 0.75, usually <= 0.5 is recommended. Higher values result in more speed-up, but with more visual quality loss.max_downsample (int): Apply ToMe to layers with at most this amount of downsampling. E.g., 1 only applies to layers with no downsampling, while 8 applies to all layers. Should be chosen from 1, 2, 4, 8. 1, 2 are recommended.sx, sy (int, int): The stride for computing dst sets. A higher stride means you can merge more tokens, default setting of (2, 2) works well in most cases.sxandsydo not need to divide image size.use_rand (bool): Whether or not to allow random perturbations when computing dst sets. By default: True, but if you’re having weird artifacts you can try turning this off.merge_attn (bool): Whether or not to merge tokens for attention (recommended).merge_crossattn (bool): Whether or not to merge tokens for cross attention (not recommended).merge_mlp (bool): Whether or not to merge tokens for the mlp layers (especially not recommended).
For more details about the tomesd setting, please refer to Token Merging for Stable Diffusion.
Then following the code below, you can evaluate the speed-up performance on stable diffusion models or stable-diffusion-based models (DreamBooth, ControlNet).
import time
import numpy as np

from mmengine import MODELS, Config
from mmengine.registry import init_default_scope

init_default_scope('mmagic')

_device = 0
work_dir = '/path/to/your/work_dir'
config = 'configs/stable_diffusion/stable-diffusion_ddim_denoisingunet-tomesd_5e-1.py'
config = Config.fromfile(config).copy()
## ## change the 'pretrained_model_path' if you have downloaded the weights manually
## config.model.unet.from_pretrained = '/path/to/your/stable-diffusion-v1-5'
## config.model.vae.from_pretrained = '/path/to/your/stable-diffusion-v1-5'

## w/o tomesd
config.model.tomesd_cfg = None
StableDiffuser = MODELS.build(config.model).to(f'cuda:{_device}')
prompt = 'A mecha robot in a favela in expressionist style'

## inference time evaluation params
size = 512
ratios = [0.5, 0.75]
samples_perprompt = 5

t = time.time()
for i in range(100//samples_perprompt):
    image = StableDiffuser.infer(prompt, height=size, width=size, num_images_per_prompt=samples_perprompt)['samples'][0]
    if i == 0:
        image.save(f"{work_dir}/wo_tomesd.png")
print(f"Generating 100 images with {samples_perprompt} images per prompt, without ToMe speed-up, time used : {time.time() - t}s")

for ratio in ratios:
    ## w/ tomesd
    config.model.tomesd_cfg = dict(ratio=ratio)
    sd_model = MODELS.build(config.model).to(f'cuda:{_device}')

    t = time.time()
    for i in range(100//samples_perprompt):
        image = sd_model.infer(prompt, height=size, width=size, num_images_per_prompt=samples_perprompt)['samples'][0]
        if i == 0:
            image.save(f"{work_dir}/w_tomesd_ratio_{ratio}.png")

    print(f"Generating 100 images with {samples_perprompt} images per prompt, merging ratio {ratio}, time used : {time.time() - t}s")
Here are some inference performance comparisons running on single RTX 3090 with torch 2.0.0+cu118 as backends. The results are reasonable, when enabling xformers, the speed-up ratio is a little bit lower. But tomesd still effectively reduces the inference time. It is especially recommended that enable tomesd when the image_size and num_images_per_prompt are large, since the number of similar tokens are larger and tomesd can achieve better performance.
| Model | Task | Dataset | Download | xformer | Ratio | Size / Num images per prompt | Time (s) |
|---|---|---|---|---|---|---|---|
| stable_diffusion_v1.5-tomesd | Text2Image | - | - | w/o | w/o tome 0.5 0.75 |
512 / 5 | 542.20 427.65 (↓21.1%) 393.05 (↓27.5%) |
| stable_diffusion_v1.5-tomesd | Text2Image | - | - | w/ | w/o tome 0.5 0.75 |
512 / 5 | 541.64 428.53 (↓20.9%) 396.38 (↓26.8%) |

w/o ToMe |

w/ ToMe Speed-up (token merge ratio=0.5) |

w/ ToMe Speed-up (token merge ratio=0.75) |
Comments
Our codebase for the stable diffusion models builds heavily on diffusers codebase and the model weights are from stable-diffusion-1.5.
Thanks for the efforts of the community!
Citation
@misc{rombach2021highresolution,
      title={High-Resolution Image Synthesis with Latent Diffusion Models},
      author={Robin Rombach and Andreas Blattmann and Dominik Lorenz and Patrick Esser and Björn Ommer},
      year={2021},
      eprint={2112.10752},
      archivePrefix={arXiv},
      primaryClass={cs.CV}
}

@article{bolya2023tomesd,
  title={Token Merging for Fast Stable Diffusion},
  author={Bolya, Daniel and Hoffman, Judy},
  journal={arXiv},
  year={2023}
}

@inproceedings{bolya2023tome,
  title={Token Merging: Your {ViT} but Faster},
  author={Bolya, Daniel and Fu, Cheng-Yang and Dai, Xiaoliang and Zhang, Peizhao and Feichtenhofer, Christoph and Hoffman, Judy},
  booktitle={International Conference on Learning Representations},
  year={2023}
}
Textual Inversion (2022)
Task: Text2Image
Abstract
Text-to-image models offer unprecedented freedom to guide creation through natural language. Yet, it is unclear how such freedom can be exercised to generate images of specific unique concepts, modify their appearance, or compose them in new roles and novel scenes. In other words, we ask: how can we use language-guided models to turn our cat into a painting, or imagine a new product based on our favorite toy? Here we present a simple approach that allows such creative freedom. Using only 3-5 images of a user-provided concept, like an object or a style, we learn to represent it through new “words” in the embedding space of a frozen text-to-image model. These “words” can be composed into natural language sentences, guiding personalized creation in an intuitive way. Notably, we find evidence that a single word embedding is sufficient for capturing unique and varied concepts. We compare our approach to a wide range of baselines, and demonstrate that it can more faithfully portray the concepts across a range of applications and tasks.
Configs
| Model | Dataset | Download |
|---|---|---|
| Textual Inversion | - | - |
Quick Start
The file structure will be like this:
data
└── cat_toy
    ├── 1.jpeg
    ├── 2.jpeg
    ├── 3.jpeg
    ├── 3.jpeg
    ├── 4.jpeg
    ├── 6.jpeg
    └── 7.jpeg
└── imagenet_templates_small.txt
└── imagenet_style_templates_small.txt
Start training with the following command:
bash tools/dist_train.sh configs/textual_inversion/textual_inversion.py 1
Inference with trained textual embedding:
import torch
from mmengine import Config

from mmagic.registry import MODELS
from mmagic.utils import register_all_modules

register_all_modules()


def process_state_dict(state_dict):
    new_state_dict = dict()
    for k, v in state_dict.items():
        new_k = k.replace('module.', '')
        new_state_dict[new_k] = v

    return new_state_dict


cfg = Config.fromfile('configs/textual_inversion/textual_inversion.py')
checkpoint = torch.load('work_dirs/textual_inversion/iter_3000.pth')
state_dict = process_state_dict(checkpoint['state_dict'])
model = MODELS.build(cfg.model)
model.load_state_dict(state_dict)

model = model.cuda()
with torch.no_grad():
    sample = model.infer('a <cat-toy> bag')['samples'][0]

sample.save('cat-toy-bag.png')
Comments
Our codebase for the stable diffusion models builds heavily on diffusers codebase and the model weights are from stable-diffusion-1.5.
Thanks for the efforts of the community!
Citation
@misc{gal2022textual,
      doi = {10.48550/ARXIV.2208.01618},
      url = {https://arxiv.org/abs/2208.01618},
      author = {Gal, Rinon and Alaluf, Yuval and Atzmon, Yuval and Patashnik, Or and Bermano, Amit H. and Chechik, Gal and Cohen-Or, Daniel},
      title = {An Image is Worth One Word: Personalizing Text-to-Image Generation using Textual Inversion},
      publisher = {arXiv},
      year = {2022},
      primaryClass={cs.CV}
}